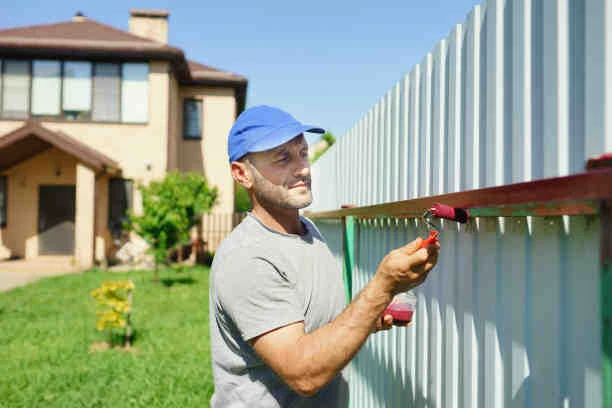
Painting and Staining Fences Like a Pro
1. Preparing Your Fence
Before you begin painting or staining, thorough preparation is key to achieving a professional finish. Here"s what you should do:
a. **Clean the Surface**: Remove dirt, debris, and any loose or flaking paint or stain. Use a pressure washer or a stiff brush for this task.
b. **Repair Damages**: Inspect your fence for any damage, such as rot, cracks, or loose boards. Fix these issues before moving forward.
c. **Sand the Surface**: Smooth out the surface by lightly sanding any rough areas. This helps the paint or stain adhere better.
d. **Protect Surrounding Areas**: Cover nearby plants, pathways, and structures with drop cloths or plastic sheets to avoid accidental splatter.
2. Selecting the Right Paint or Stain
Choosing the right paint or stain is crucial for achieving a professional look. Consider these factors:
a. **Paint vs. Stain**: Paint offers solid color coverage and excellent protection against the elements, while stain allows the wood"s natural grain to show through. Choose the one that suits your aesthetic preferences and maintenance goals.
b. **Quality Matters**: Invest in high-quality paint or stain that is specifically designed for outdoor use. They are more durable and provide better protection.
c. **Color Selection**: If you"re painting, select a color that complements your home"s exterior. If you"re staining, choose a shade that enhances the natural beauty of the wood.
3. Applying Paint or Stain
Now, let"s get into the actual application process:
a. **Use the Right Tools**: Opt for high-quality brushes or paint sprayers for an even application. Rollers can be efficient for larger areas.
b. **Follow the Grain**: When applying paint or stain, always follow the grain of the wood for a smoother finish.
c. **Apply Multiple Coats**: In most cases, applying two coats is recommended. Follow the manufacturer"s instructions for drying time between coats.
d. **Work in Sections**: Paint or stain a section of the fence at a time to maintain a wet edge and avoid visible lap marks.
e. **Be Neat and Precise**: Take your time to ensure clean lines and avoid drips or uneven coverage.
4. Protecting and Maintaining Your Fence
A professional finish is only part of the equation. To keep your fence looking its best, consider the following:
a. **Seal and Protect**: After painting or staining, apply a clear sealer or topcoat to protect your fence from UV rays, moisture, and other environmental factors.
b. **Regular Maintenance**: Perform regular inspections and maintenance to address any issues promptly. Touch up areas with paint or stain as needed.
c. **Clean as Necessary**: Periodically clean your fence to remove dirt, mold, and mildew, which can mar the finish.
d. **Reapply as Required**: Be prepared to repaint or restain your fence every few years, as the finish will naturally wear over time.
Conclusion
Painting or staining your fence like a pro can transform your outdoor space, enhancing its beauty, protection, and longevity. With the right materials, proper preparation, and attention to detail during application, you can achieve a professional finish that will make your fence a standout feature of your property. Remember that regular maintenance is essential to keep your fence looking its best year after year. Whether you"re a seasoned DIY enthusiast or a first-time painter, following these guidelines will help you achieve the results you desire for your outdoor space.


.webp)